

PART I: CONCEPTS OF STRETCHING, MY ANALOGY & MY PERSONAL STRETCHING ROUTINE
 |
| Above: me with a candy cigarette party prop |
Ok, let's cut to the chase; I am told quite often that I have "great gams." From the butcher at my local gourmet grocer to people in the gym to random messages from blog and Facebook friends. Genetics obviously play a major role here but dedication to my fitness routine has definitely toned my legs. A healthy low-fat low-processed carb diet is MOST important. I was asked by several followers to write a blog about my best kept fitness secrets, from the leg up! Part one of this blog will cover the essentials of exercise and a demonstration of my STRETCHING routine.
About Me and my Fitness Philosophy:
Those of you who know me well know that I'm passionate about my beliefs. If you don't know me, it's safe to believe this is a true statement. By that, it means that I strive to be the best in anything I do. I do my research, I study, I take classes and lessons, and analyze the pros and cons of what I am absorbing through trial and error. Some like to call it perfectionism, I prefer to call it motivation and determination. I don't do anything halfway and I'm the farthest thing from a procrastinator. When I decide to commit to something, I go at it head first. Since my post baby fitness kick started about 3 years ago, I have hyper-focused on my health. I took the best things I learned from my personal trainer and, most importantly, the things my own body told me. I studied and trained with the top industry professionals and challenged myself to obtain a personal training certification. With that said, I hope you find my advice informative. I advise you to only do what is within your comfort zone. Many injuries occur when a student tries to be the teacher (one of the first things I learned at the AFAA on-site training workshop). If it doesn't feel good or right, DON'T DO IT! Your body's "voice" is your best advocate for injury prevention. Your joints and muscles may respond differently than mine to exercise due to experience level, dysfunction (due to prior injury), or lack of balance and coordination. Start slowly and ease into it. Movement should be slow with precision (holding should be longer rather than fast pumping). Cervical spine (neck and shoulder), thoracic spine (back) and pelvic region (hips and pelvis), should all be in a neutral position (all three in alignment) with the pelvis tilted under the body, not protruding forward pushing the belly and hips out). Before every move is executed, the core should be activated (drawing the belly button inward towards the back). Every movement should be felt in the core. This is the difference between pushing weights around with your limbs and bulking up, and having a strong stable core anchor and properly distribute the work. If you don't feel your core working with every movement, you are not exercising to your body's core potential. Every body part is simply the extension of its core.
Now to the "inferior plane" (lower extension) of the body, the legs. Based on personal experience, my toned legs don't come from the resistance using machines nor heavy weight but from the resistance of my own body weight.

MY THEORY:
MY THEORY:
I believe "machines" wreck your body. Machines put you in unnatural, compromising positions (especially leg machines). This is my own personal analysis. I avoid stair climbers and indoor cycling classes as well. If you are naturally a rail, this may be okay for toning your legs, but if not, you are just adding bulk). Biking is detrimental to your posture. With your hips hinged and your body in a crunching (spinal flexion) position, this is a recipe for disaster. A better choice for indoor biking is the upright bike but even then, a lot of pressure is placed on the hips and sacrum as well as tug on the lat muscles in the lower back. The standard bent forward biking position places you in "spinal flexion," a totally unnatural position that a spine should never be in. I have spent hundreds of hours studying for my fitness certification, and thousands of hours in the gym. I have suffered all kinds of minor injuries, and learned through trial and error how to avoid anymore. A certification is great, but experience is ALWAYS better.

A PROPERLY CONDITIONED BODY IS A BODY READY TO RECEIVE RESISTANCE OR IS READY FOR SPORT:
Let's stay on point here. I have had core, posture, balance and coordination training, which should come before anything else. Why so important? Posture places your body in the proper neutral position, lining up your skeletal structure (cervical spine, spine and pelvis are imperative). A strong core is the anchor in which all our body parts stem and move (range of motion). Balance and coordination aid in executing the moves properly. With this combination, I am ready to begin my leg routine. I never begin without static stretching, which means holding a position for 15-30 seconds.
STRETCHING AND ROLLING OUT IS IMPERATIVE IN ORDER
TO MAINTAIN FLEXIBILITY AND PREVENT INJURY (JUST DONT OVERDO IT):
MY PERSONAL STRETCHING ROUTINE:
I begin by "rolling out" all of my muscles on a foam roller. This is a great gentle way to warm up your body, and loosen the muscles.

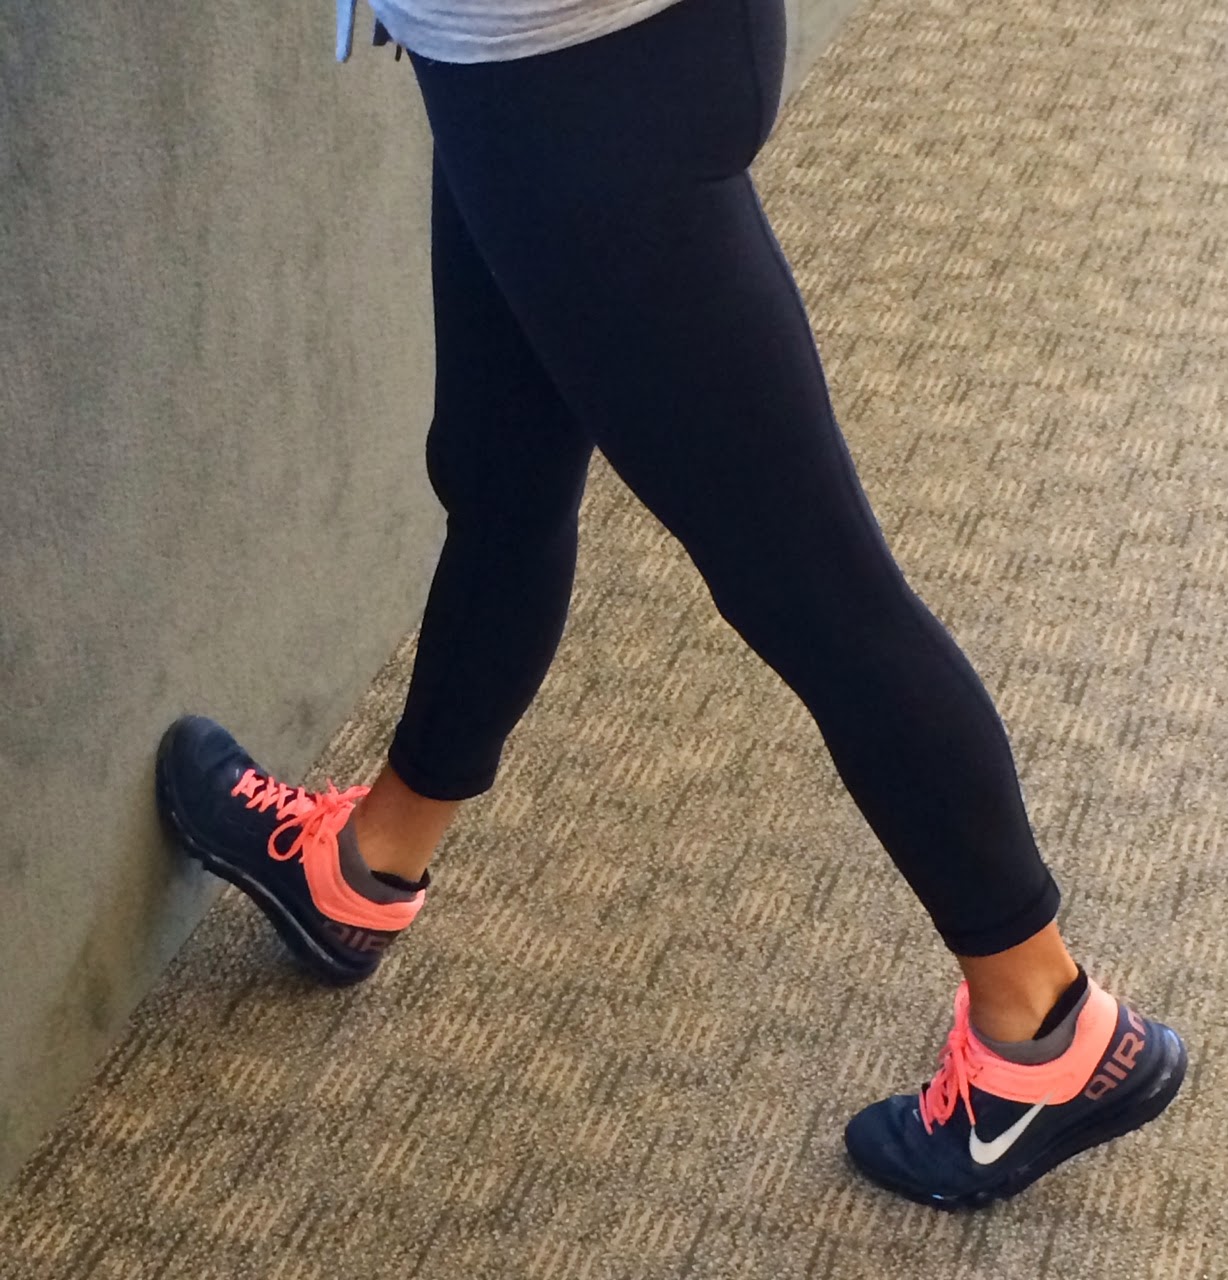
Next, I stretch my calf muscles. Standing face forward towards a wall, palms on the wall, and foot in a dorsi flexion (toes towards the nose) position, also up on the wall. I am careful not to over stretch, and move into the stretch slowly, as I lean forward into the stretch.
 |
| Brace yourself! |
Don't push it! You want to feel a gentle stretch, not tear a muscle over doing it!
Below: I stretch my shins by bracing myself with two hands on the wall again. Leaning into the wall chest first, I place the top of my foot on the ground, toes pointing backwards in a planter flexion (toes extended away from the body) until I feel a gentle stretch in my shin. I stretch one leg at a time.

My next leg stretch is a quadricep stretch. With one hand, I brace myself on a wall and with the other, I am grabbing the front of my ankle, slowly and carefully pulling my leg up, guiding my heel towards my backside.
 |
| Brace yourself on something such as a wall or ledge. |
In the neutral position, bend one knee, grab that foot and slowly draw your foot back towards your backside (gluteus maximus) until you begin to feel tension. Only go as far as the tension is "comfortable."


Then comes a hamstring stretch. One thing you should never do is reach down and touch your toes, and even worse, in what is called a ballistic or bouncing fashion. Here, you are in spinal flexion with your spine out of the neutral position. You actually end up pulling more lat muscles in your lower back and tug on the hips and sacrum. The best way I was taught to execute this stretch is to separate your legs shoulder width apart. Next, begin squatting down slightly (in a neutral position), making sure your knees don't extend past your toes. Place your palms on your quads, fingers towards the inside of your leg. Slowly lift your toes until you feel a stretch in the hamstrings. In the same position, carefully lift your heels. If you are comfortable, roll your feet out to the sides (on the outside of your feet).
 |
| Step I: In a neutral position here with hands on my quadriceps, squatting in a seated position |
 |
| Step II: raise the toes for an additional stretch |
 |
| Step III: With ankles rolled outward, I am stretching both my hamstrings and IT band |
Another hamstring stretch below is (in a neutral position) to place both hands on one quad muscle, and shift the opposite leg and weight to the side, bending the knee and slightly dropping the backside towards the floor. The stretch should be felt in the hamstring of the straight leg. Tip: Watch those knees don't protrude past your toes!

Below: Cross over hip stretch (piriformis muscle stretch, aka: butt muscle) (MY ABSOLUTE FAVORITE STRETCH). On the side of a physio ball, in a neutral position, slowly roll your lower back down one side of the ball, while simultaneously bracing one foot on the wall to get into position (careful not to fall off!)

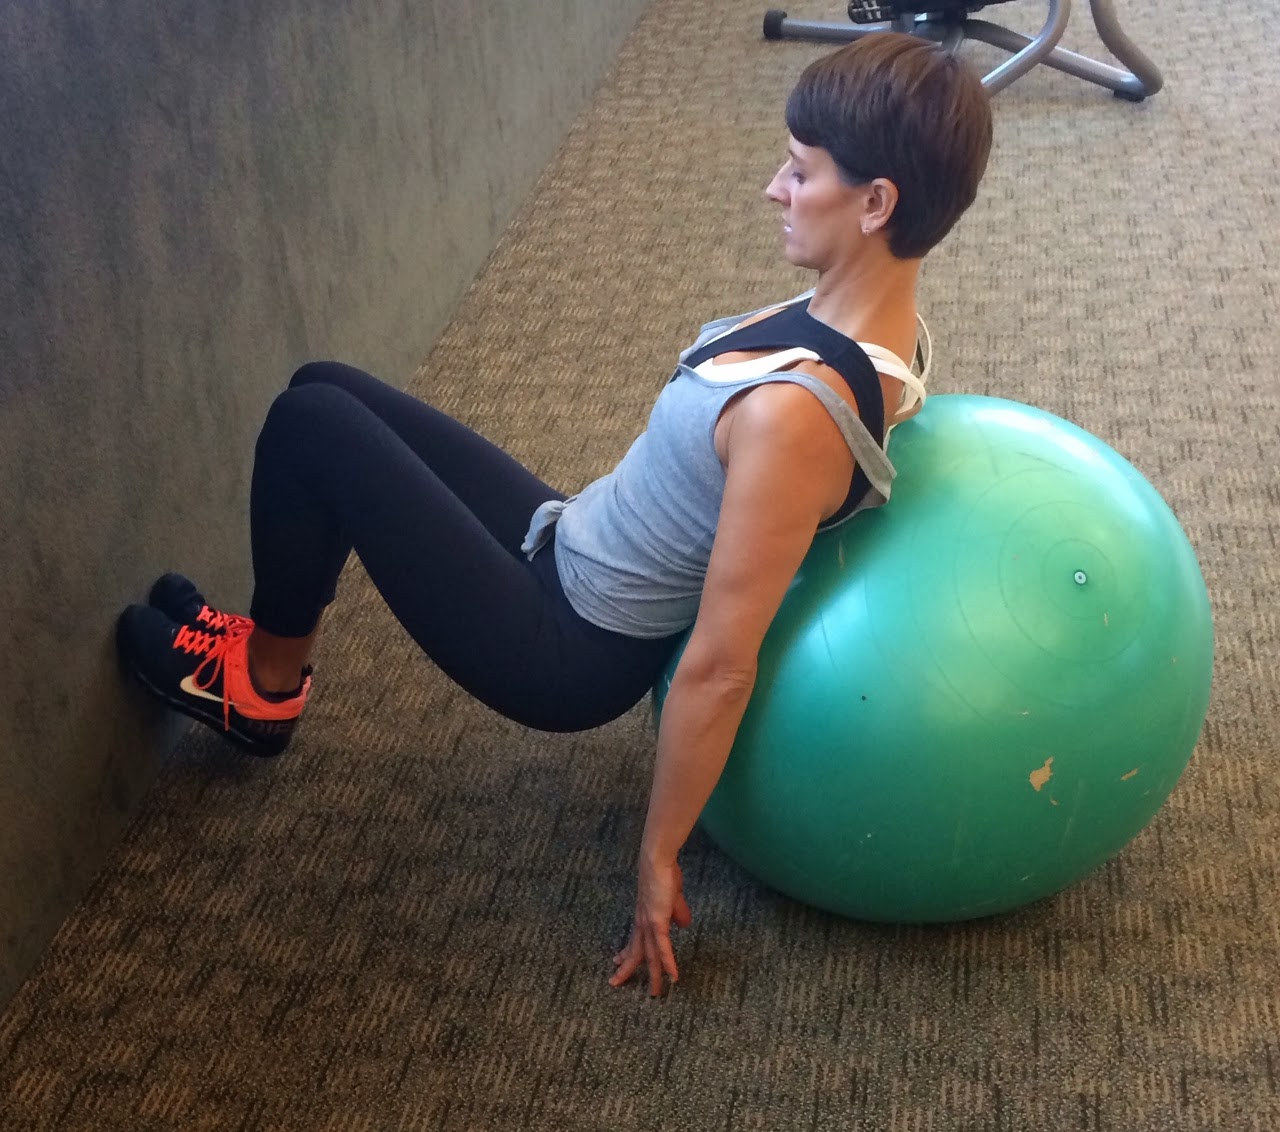


Tip: place a folded towel or cushion beneath the knee on the floor to prevent injury to the knee.

Step one: Hand wrapping


Below: Cross over hip stretch (piriformis muscle stretch, aka: butt muscle) (MY ABSOLUTE FAVORITE STRETCH). On the side of a physio ball, in a neutral position, slowly roll your lower back down one side of the ball, while simultaneously bracing one foot on the wall to get into position (careful not to fall off!)
Next, I brace myself on one hand on the floor, and slowly lifting the opposite leg and placing it just above the knee
 |
| Begin sinking your backside towards the floor for a full stretch. Do this on both sides. |
Below: Quad stretch: on the side of a bench, place one knee on top of the bench and the opposite foot on the floor. Place two hands on the bench, arms straight
Shifting your weight forward, bend your knee and reach back grabbing the front (above) the ankle area
In the neutral position, slowly and carefully pull the leg towards the buttox. Only go as far as the tension comfortably allows. You should feel this in the front upper region of the benched leg (quadricep).
 |
| A more advance version is for a well balanced,flexible and injury-free athlete. |
Starting in a sprinting position with two hands on the floor and one knee on the ground, pull the leg with the knee on the ground back (shin) up against the wall.
Slowly place hands above the opposite knee and push yourself up into the neutral position. You will immediately feel a big stretch in the quadricep close to the wall.
WARNING: Please don't try this if you are not a flexible athlete!
 |
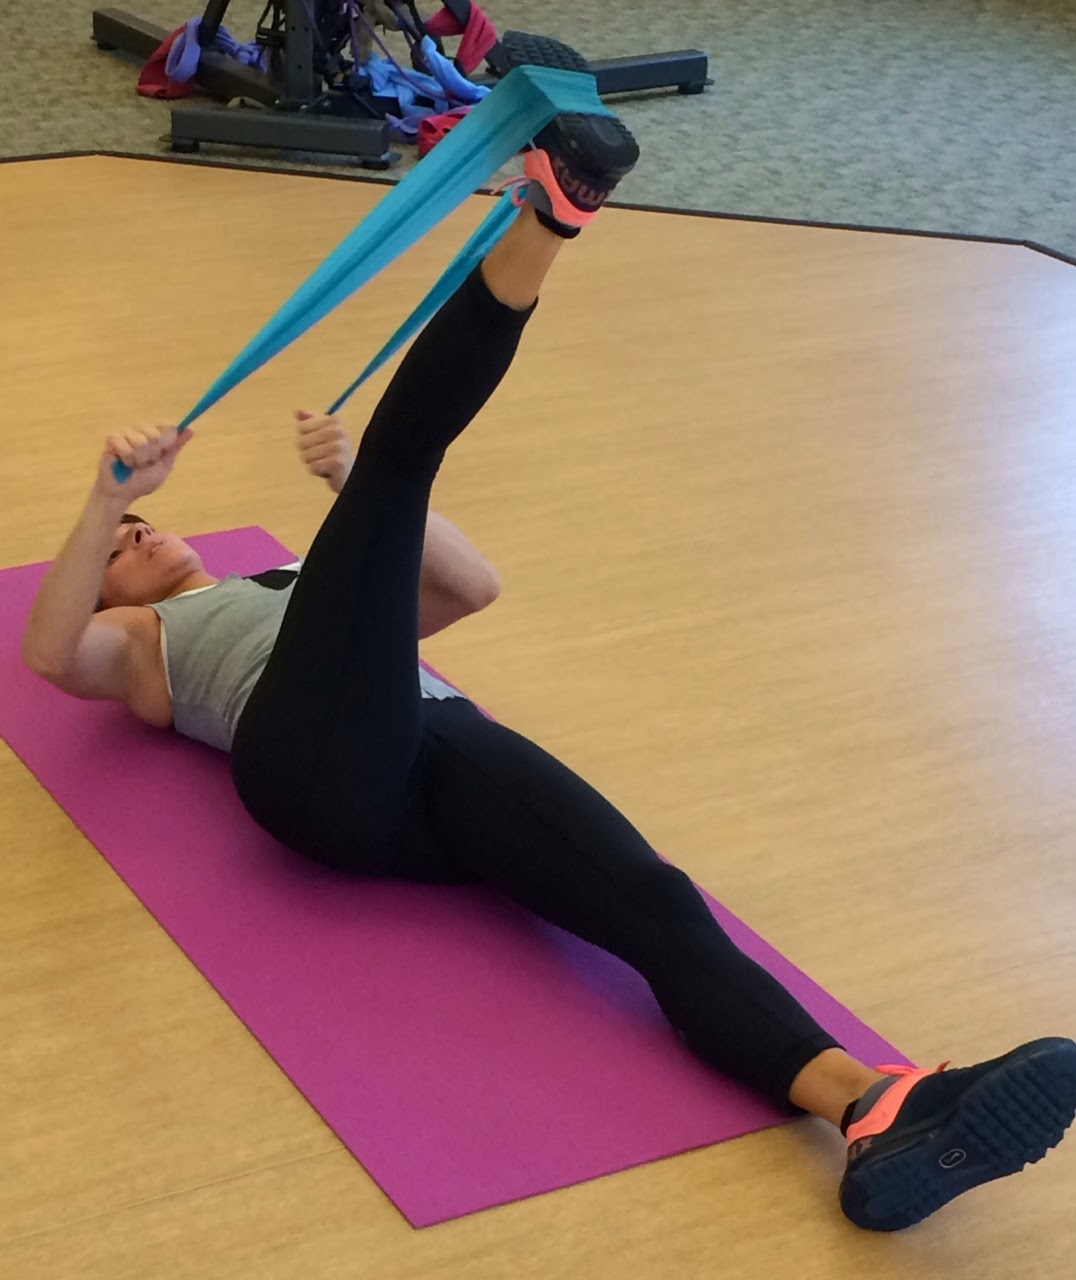
| I use an exercise stretchy band to stretch my IT band, and my groin (adductors) area. |
Lying flat on your back in a supine position (face up), grab a hold of each end of the stretchy band and place it under the arch of your foot. Pull the ends towards your chest while you stretch your foot upward (keeping a slight bend I'm the knee)
Step two: Twirl the band around the hand until you have a firm grip on it. Wrap and grip.
Below: slowly raise the leg straight towards the ceiling (approx 75/80 degree angle or as comfortably as your hips and muscles will allow)
Now, while securely anchoring your leg with the stretchy band, slowly allow your leg to fall out to the side.
 |
| This abduction move (away from the center of the body) will stretch the adductors (the muscles in the inner thigh) |
Performing adduction (towards the body). Bring the leg straight up again to the first position and then allow the leg to fall in crossing the body to the opposite side. You will have to move the arms in the opposite direction (see next photo) HOLD ON TIGHTLY TO YOUR BAND!
Well, that wraps up my favorite leg exercises and personal routine. I hope that you find this information informative and can apply it to your everyday fitness routine.
STAY TUNED FOR PARTS II AND III:
II: Leg Exercises for "Great Gams"
III: Cardio for "Great Gams" and Beyond
In Good Health~
Jamie
Anatomical directional terms are like the directions on a compass rose of a map. Like the directions, North, South, East and West, they can be used to describe the locations of structures in relation to other structures or locations in the body. This is particularly useful when studyinganatomy as it provides a common method of communication that helps to avoid confusion when identifying structures.
Reference:
Anatomical Directional Terms and Body Planes
Lateral: Toward the side, away from the mid-line
Medial: Toward the mid-line, middle, away from the side
Rostral: Toward the front
Caudal: Toward the back, toward the tail
Medial: Toward the mid-line, middle, away from the side
Rostral: Toward the front
Caudal: Toward the back, toward the tail
Anatomical Directional Terms:
Anterior: In front of, front
Posterior: After, behind, following, toward the rear
Distal: Away from, farther from the origin
Proximal: Near, closer to the origin
Dorsal: Near the upper surface, toward the back
Ventral: Toward the bottom, toward the belly
Posterior: After, behind, following, toward the rear
Distal: Away from, farther from the origin
Proximal: Near, closer to the origin
Dorsal: Near the upper surface, toward the back
Ventral: Toward the bottom, toward the belly
Superior: Above, over
Inferior: Below, under
Lateral: Toward the side, away from the mid-line
Lateral: Toward the side, away from the mid-line
Medial: Toward the mid-line, middle, away from the side
Rostral: Toward the front
Caudal: Toward the back, toward the tail
Medial: Toward the mid-line, middle, away from the side
Rostral: Toward the front
Caudal: Toward the back, toward the tail
Anatomical Directional Terms and Body Planes
Also as with a compass rose, each directional term often has a counterpart with converse or opposite meaning. These terms are very useful when describing the locations of structures to be studied indissections.
Anatomical directional terms can also be applied to the planes of the body. Body planes are used to describe specific sections or regions of the body. Below are examples of some commonly used anatomical directional terms and planes of the body.
Anatomical Directional Terms:
Anterior: In front of, frontPosterior: After, behind, following, toward the rear
Distal: Away from, farther from the origin
Proximal: Near, closer to the origin
Dorsal: Near the upper surface, toward the back
Ventral: Toward the bottom, toward the belly
Superior: Above, over
Inferior: Below, under
Lateral: Toward the side, away from the mid-line
Medial: Toward the mid-line, middle, away from the side
Rostral: Toward the front
Caudal: Toward the back, toward the tail
Anatomical Body Planes:
Imagine a person standing in an upright position. Now imagine dissecting this person with imaginary vertical and horizontal planes. This is the best way to describe anatomical planes. Anatomical planes can be used to describe any body part or an entire body. (View a body plane image.)Lateral Plane or Sagittal Plane: Imagine a vertical plane that runs through your body from front to back or back to front. This plane divides the body into right and left regions.
- Median or Midsagittal Plane: Sagittal plane that divides the body into equal right and left regions.
- Parasagittal Plane: Sagittal plane that divides the body into unequal right and left regions.
Transverse Plane: Imagine a horizontal plane that runs through the midsection of your body. This plane divides the body into upper (superior) and lower (inferior) regions.
Understanding anatomical directional terms and body planes will make it easier to study anatomy. It will help you to be able to visualize positional and spacial locations of structures and navigate directionally from one area to another. Another strategy that can be employed to help you visualize anatomical structures and their positions is to use study aids such as anatomy coloring books and flash cards. It may seem a bit juvenile, but coloring books and review cards actually help you to visually comprehend the information.
No comments:
Post a Comment